Page contents
- Candidate invitation
- Prepare expenses claim
- Business partner entry
- Bank account entry
- Enter travel details
- Enter expenses
- Submit expenses claim
1. Candidate invitation
Invitations to interviews or medical examinations are sent to your email address in the form of AGM notifications.
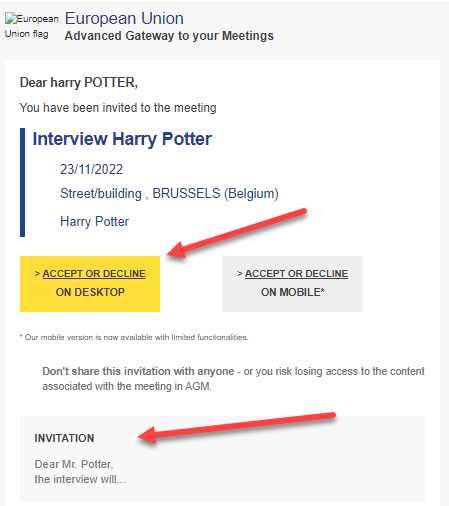
Read the invitation and click Accept or decline on desktop.
To access AGM, use your EU LOGIN account. If you don't have an EU LOGIN account, create one on the EU-Login page.
Logging in to AGM requires 2-factor authentication and you need to set up your EU-Login account accordingly.
We recommend to use the EU-Login app as 2nd authentication factor - the video below explains how to:
Check this description for all options.
AGM will send important information to the email address you specified in your EU LOGIN account. If you need to update your email address, update it in your EU-Login account (don't create a new EU-Login account for the new email address).
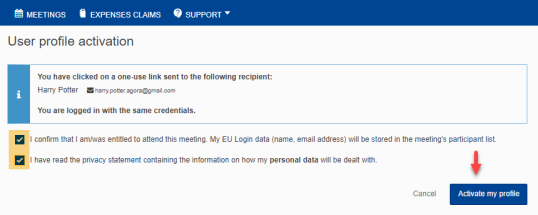
After authenticating with your EU-Login account, you’ll be asked to link the meeting to your user profile.
Click the check boxes.
Click Activate my profile
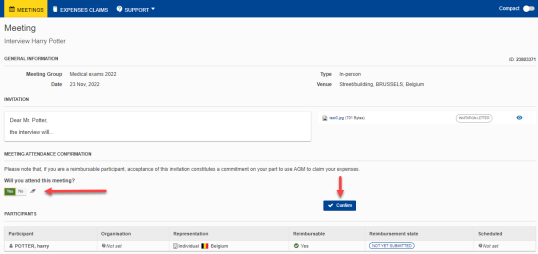
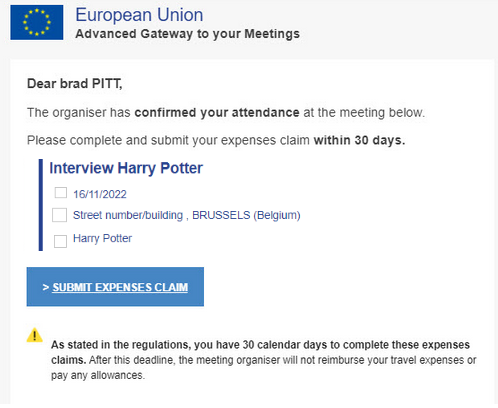
The meeting invitation appears. You can now read it, view any attachments and confirm your attendance. Click Yes to confirm your attendance
2. Prepare expenses claim
You have received an AGM notification informing you that you are entitled to claim expenses. You can prepare your claim by entering your bank details even before the meeting. But before you do this, read the rules regarding travel expenses reimbursement.
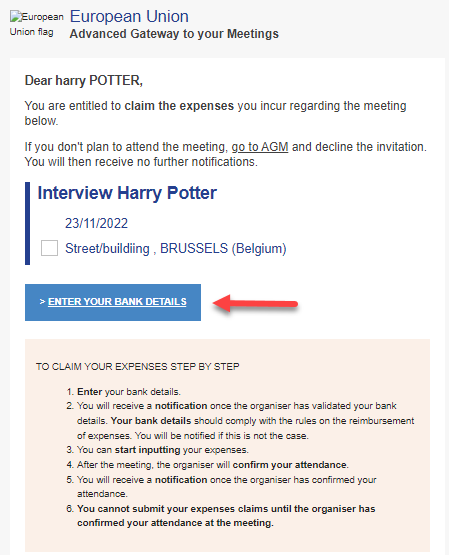
Click the button Enter your bank details. This link takes you to the Bank details section of your claim in the AGM front office.

It is possible that you can simply select bank details if you entered them on a previous occasion in the EC system. If this is not the case, scroll to the bottom of the page and click +Add new Bank details.

3. Business partner entry
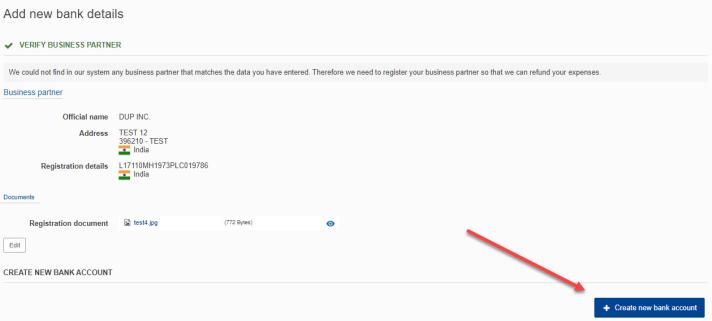
After you clicked Add new Bank details, your are now in the Verify Business partner section.

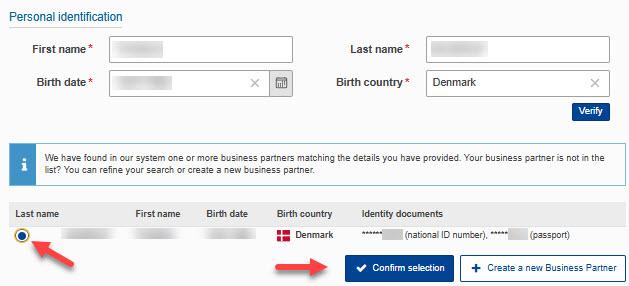
Fill in the details in all fields of the Personal identification form.
Click Verify.

You must run this search/verification check even if you know that you don’t yet have a business partner entry in the system. Only after the verification fails you will be able to create a business partner.
If you’ve already defined a business partner in the EU accounting system, please search with the same information you used at the time. Click Verify to start the search.
Results are displayed with the last four digits of the ID that you provided. If you identified your entry, please select the option button before the family name and click Confirm selection.
After you found your business partner entry, continue reading in the bank account section.
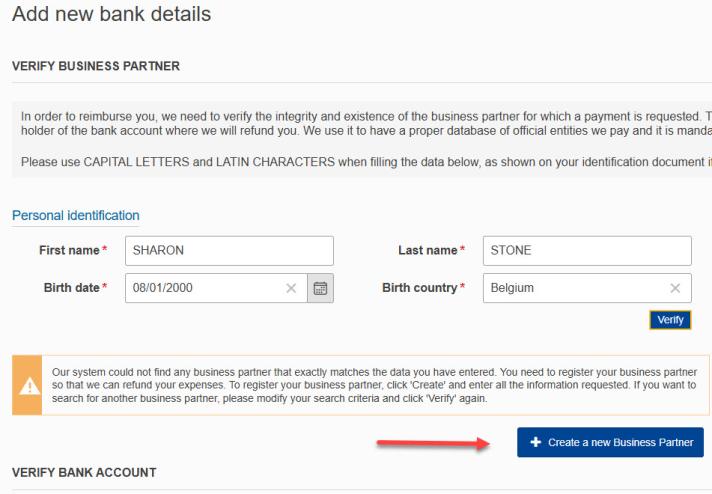
If there are no matches for your business partner, you can
- perform the search again by entering other data in the personal identification fields and clicking Verify again
- click +Create a new business partner. You can do this not only to create a new business partner in the EC-system, but also if you think that you already have a business partner entry, but can’t find it in the verification step. When creating the business partner, the system will still try to match your information to existing business partner.
The Add new business partner form opens.
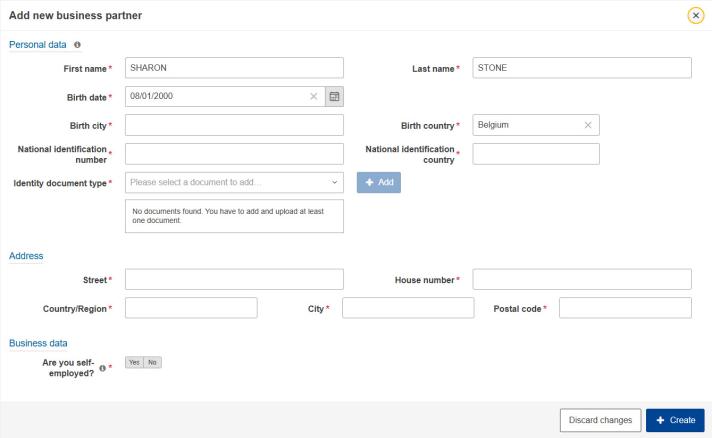
Personal data
Fill in all fields in this section
National identification
Not all countries have a national identification number.
- If entering a national identification number is mandatory for your country (e.g. Portugal, Sweden, Netherlands), you must enter it together with one other piece of ID, for example your passport number.
- For Italy, enter your fiscal code as national identifiction number.
- For Portugal, enter your Portuguese ID card number (8 digits) without the document number (4 characters) in the National identification number field.
If your country doesn’t have a national identification number (e.g. USA, Germany), you can enter one type of ID plus country. If you are not sure about the national identification number, enter all other details in this form and click Create. If you need to enter a national identification number you will get an error:

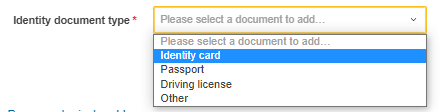
Click into the Identity document type field and select the type of ID you wish to enter (one is sufficient).
Click Add.

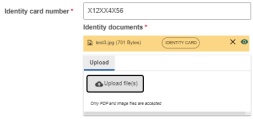
Enter the ID card number and country.

Scan ID document (if possible both sides). Click Upload file(s):

Select the scanned file from your harddisk.
Address
All fields are obligatory.
Business data
Select whether you are self-employed.
If you indicate that you’re self-employed, an additional menu appears. Fill in the registration number and upload the registration document. The VAT number is not mandatory, but if you enter it, you also have to upload a VAT statement document.
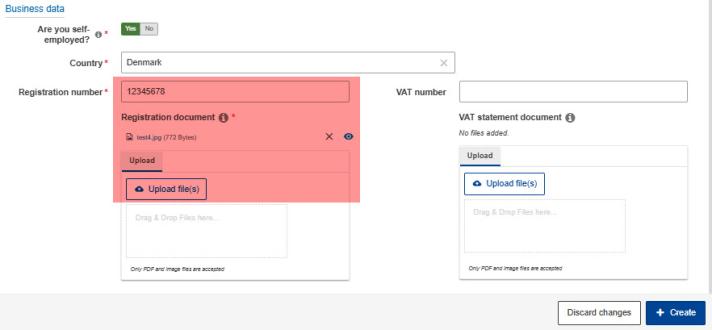
Click Create.
After clicking Create, the system checks the numbers. If a number is not possible for the selected country, an error message is displayed at the bottom and top of the form.
Once you’re satisfied, continue to the section Verify Bank account.
4. Bank account entry
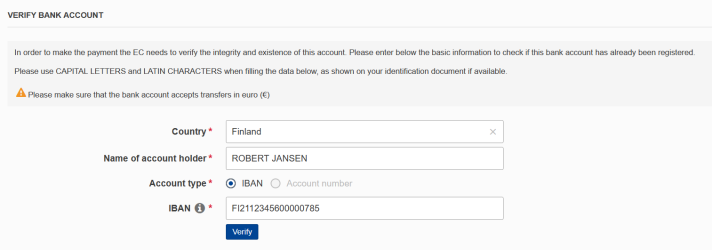
Select your country in the Verify bank account section.
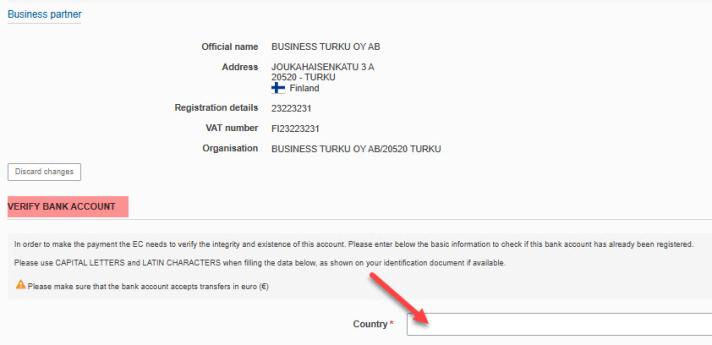
Fill in the name of the account holder and the account number/IBAN, then click Verify.
If the bank account is not in the system, either click +Create a new bank account and create an new entry for the bank account in the EC system.
If the system found the bank account, click Confirm under Confirm bank details. Back in your bank account list press Select in order to select the bank account for this meeting.
If you don't find an appropriate bank account, click +Create new bank account:
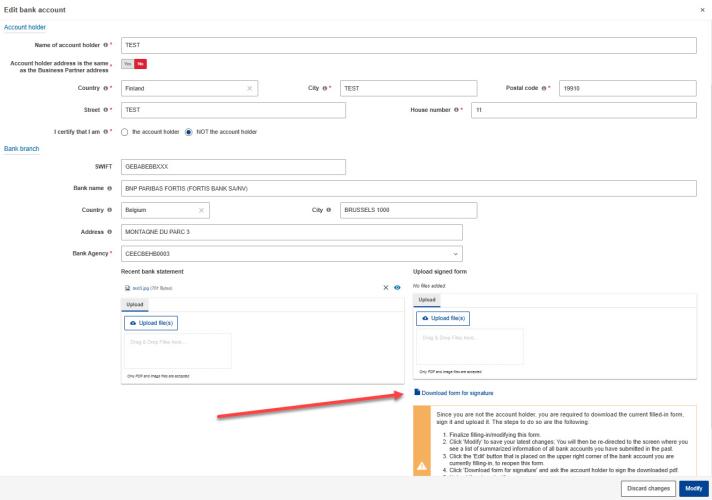
If the account holder name and account name are different, this needs to be reflected by the supporting documents (bank statement and/or financial information form).
- If you are the account holder, upload a recent bank statement (max. 6 months old). It should confirm the information that you've entered under Account name, Account number/IBAN and Bank name and click Confirm.
- If you are not the account holder, fill in all details and click Confirm. Then provide the financial form signed by the account holder (and the bank unless you can also provide a recent bank statement) by downloading the form and uploading it signed. But first read how to fill in the other details.
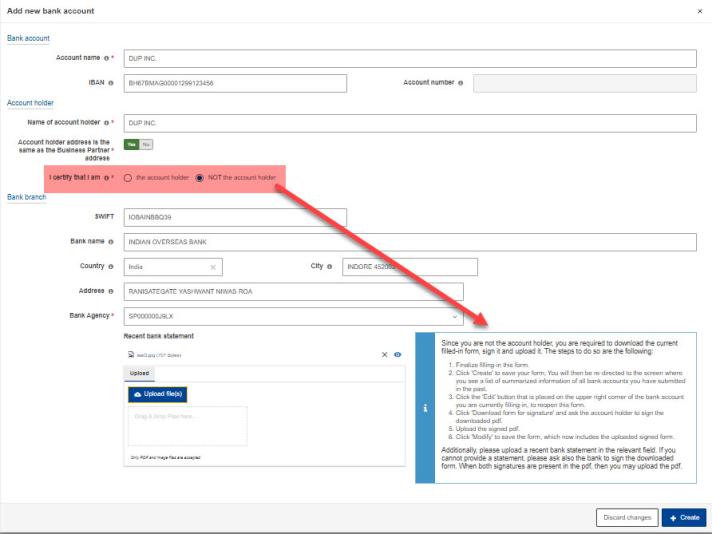
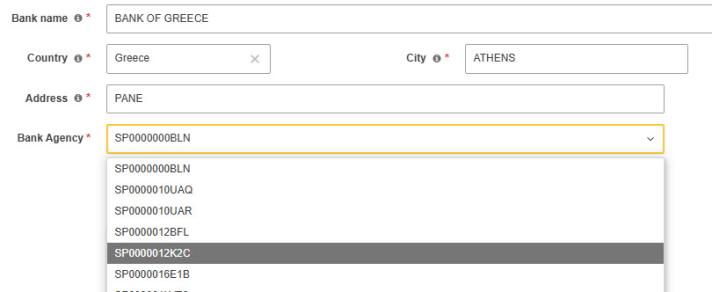
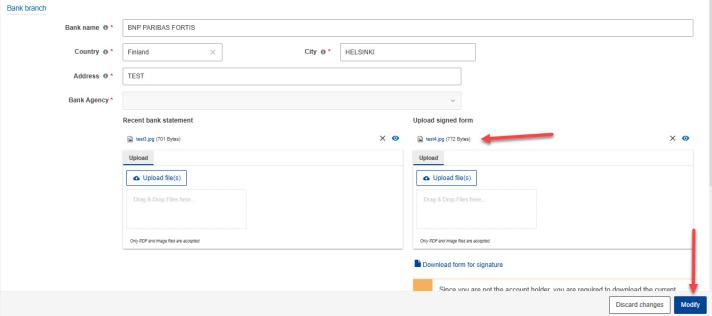
The system uses your input in the fields in the section Bank branch to find bank agencies that you can then select in the Bank agency field. A selection in the Bank agency field is mandatory. Because your input acts as a filter, it is better not fill in too much into the free text fields City and Address.
- Only fill in the SWIFT code and then immediately select an entry in the Bank agency field.
- Try appending XXX or XXXX to you SWIFT code. If you get a list of Swift codes for your bank, select an entry from the list.
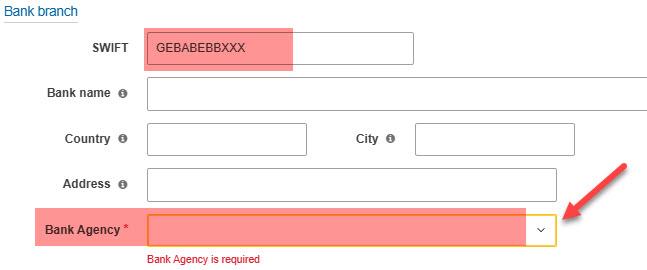
- If your SWIFT code doesn't work, leave the SWIFT field empty.
- In all text fields, remove trailing spaces before or after your text (often spaces are added when you copy and paste text).
- With an empty SWIFT field, fill in all other fields, enter the bank name, select the country and enter the city name (without postal code). In the Address field, fill only in the street name or parts of it (without additions like house number). Select an entry from the Bank agency field.
Click Create.
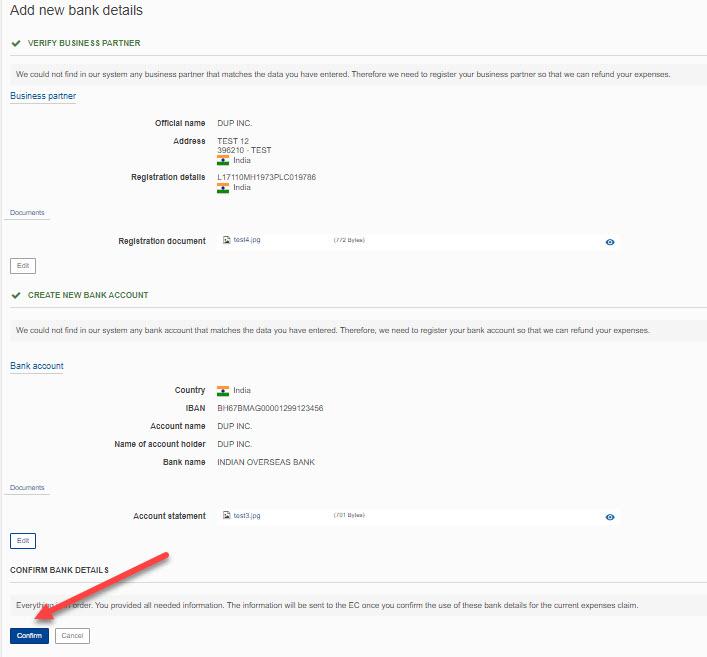
Click Confirm. The new financial data will be added to your list of bank details, but there are a few more steps.
The list of bank accounts is displayed. Scroll down to the bank account that you want to use for this claim.
If you are the account holder, click Select below your bank account:
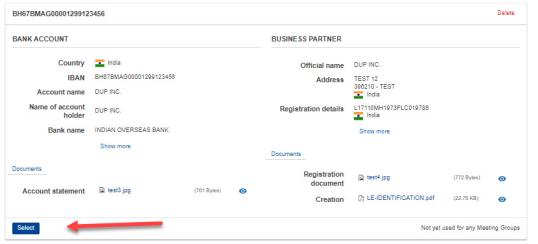
Download/upload form if you are not the account holder
If you are not the account holder, you need to first obtain/upload the signed financial form before you should click Select:
Click Edit in the bank account section (see below)

In Edit bank account form, click Download form for signature:
Upload the completed financial information form in the Upload signed form section, then click Modify:
- Click Select below the bank account that you want to use for the meeting.
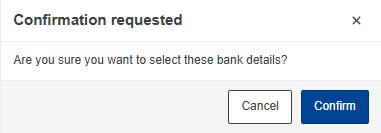
The next prompt can be simply a confirmation:
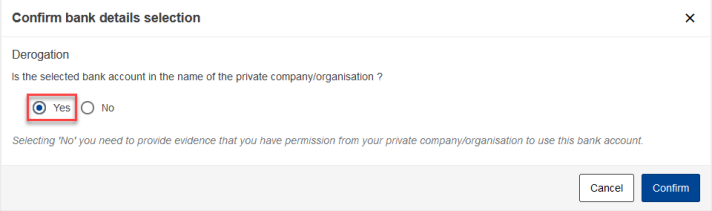
You will only see the pop-up below if you were invited as representative of an organisation. If the account is in the name of your organisation select Yes.
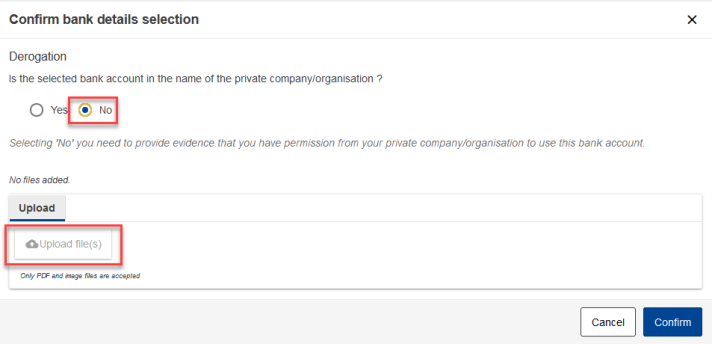
If it's a personal account, select No in the pop-up menu (see Uploading a permission to use a personal bank).
A blue banner is displayed to inform you that you’ve submitted your bank account for validation.

You will receive a notification once our financial staff has validated your bank details. Only then you can submit your claim, but you can continue immediately with entering the Travel details (and expenses details).
The validators can also request changes of your bank account details through an AGM notification.
When the validation is finished, AGM will notify you that you can continue to submit your claim (by clicking the Submit button in the Summary tab).
5. Enter travel details
Click the Travel Details icon.
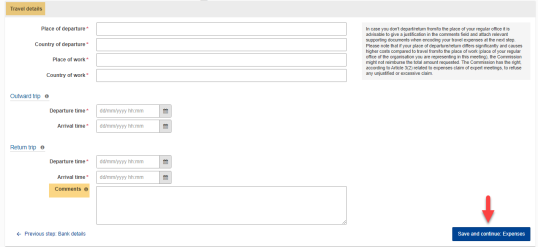
Fill in all the information about your trip.
Describe special circumstances in the Comments field. This could be for example, that you are claiming for 2 adjacent meetings, Then click Save and continue: Expenses.

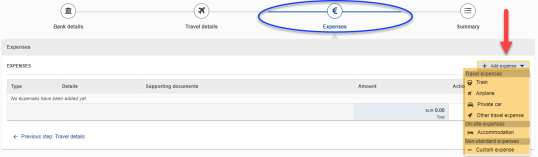
6. Enter expenses
Before creating your claim, please check the reimbursement rules for candidates.
Click on the Expenses tab. It is possible that not all expense types shown below are available for your meeting. We will show the steps for the types train, airplane and accommodation.
Click Add expenses and select an expenses type. Even if you are entitled to a daily allowance, you can’t manually add the Daily allowance in the expenses category. This value is added automatically based on the number of days the meeting lasts.
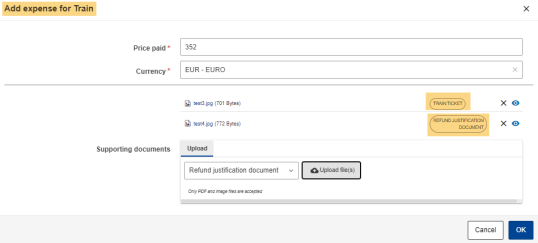
Train
Click on Train in the Add expenses pull down menu.

- Enter the ticket price and select the currency.
- Select the document type.
- Upload the supporting documents.
- If nothing happens after selecting the document type and clicking Upload, ensure that your browser does not block pop-ups.
- Click OK.
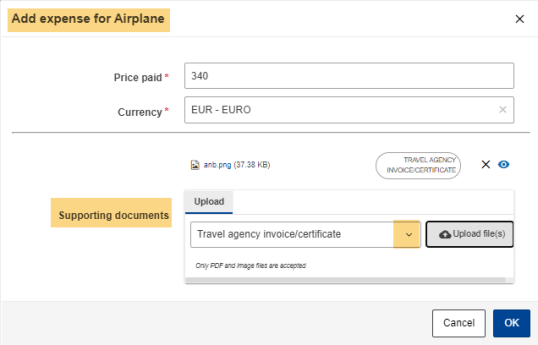
Airplane
Click on Airplane in the Add expenses pull down menu.

Enter the ticket price and select the currency.
- Select the document type.
- Click Upload.
- If nothing happens after selecting the document type and clicking Upload, ensure that your browser does not block pop-ups.
- Click OK.
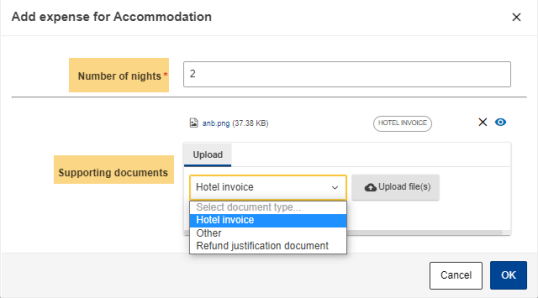
Accommodation
Click on Accommodation in the Add expenses pull down menu.
- You first need to enter the number of nights.
- Select the document type.
- upload supporting documents such as the hotel bill (only non-editable attachments are allowed: PDF, JPG, PNG, TIF, TIFF, BMP and GIF, and you should provide at least one supporting document for each expenses claim)
- If nothing happens after selecting the document type and clicking Upload, ensure that your browser does not block pop-ups.
- Click OK.
7. Submit expenses claim
Prerequisites before you can submit your expenses claim are:
1. The meeting has taken place and you’ve received the notification that you can now submit your expenses claim in AGM
2. You've introduced the bank account and legal entity details that you want to use for processing the claim and these have been validated.
3. You filled in the travel details and specified applicable cost types as described above.
4. After the meeting has been closed in AGM you have 30 days to submit this claim. If you need more time, ask your HR contact to extend the submission time. If you do not have this contact, check with the AGM Support. The maximal submission time is 90 days.
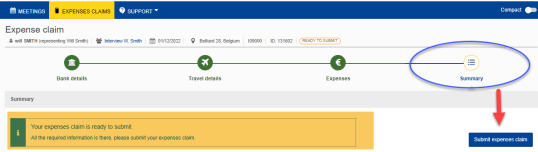
Click the Summary icon.

Then scroll down and click Submit expenses claim.
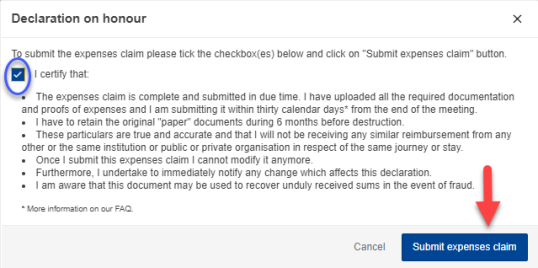
To finalise your claim, select the check box of the pop up window and again click Submit expenses claim.
Your expenses claim is now submitted for validation and payment processing.
If our financial staff has questions or request changes, they will contact you through an AGM notification email.
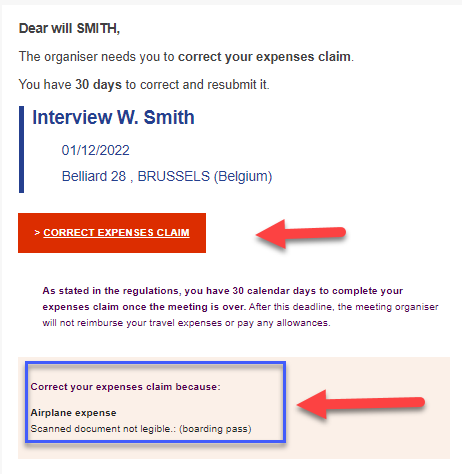
Clicking on the button Correct expenses claim will bring you (after authentication with the previously used EU-Login account) to your claim.
After the claim has been paid you can download a summary document in pdf format.